Tooling
We try to use a few tools that interoperate well and are open source and collaborative.
We also explore and learn new tools but always always with an eye towards interoperability with our current tooling, and with an understanding of how the open science community and environmental/Earth science communities are working.
Below are the tools that we use, why we use them, and set up instructions. (Here are some Macbook setup notes).
We use Eventbrite to manage registrations for events like the Pathways to Open Science series, and Community Calls. We plan to explore Zoom registration to see if it’s a good alternative for our needs.
For Pathways to Open Science, we created a “series” of 6 events instead of individual events. Challenge was that every event will list the same duration, while reality was they alternated weekly with 1.5hrs for community call and 1hr for coworking.
Eventbrite - Zoom - Google Cal how-to set up an event
Recommended workflow for now:
Create Google Cal invite > make it a Zoom meeting from inside that invite (if your Google Cal is integrated with Zoom ) > save. That meeting will appear in your Zoom account. Confirm it has waiting room and no password.
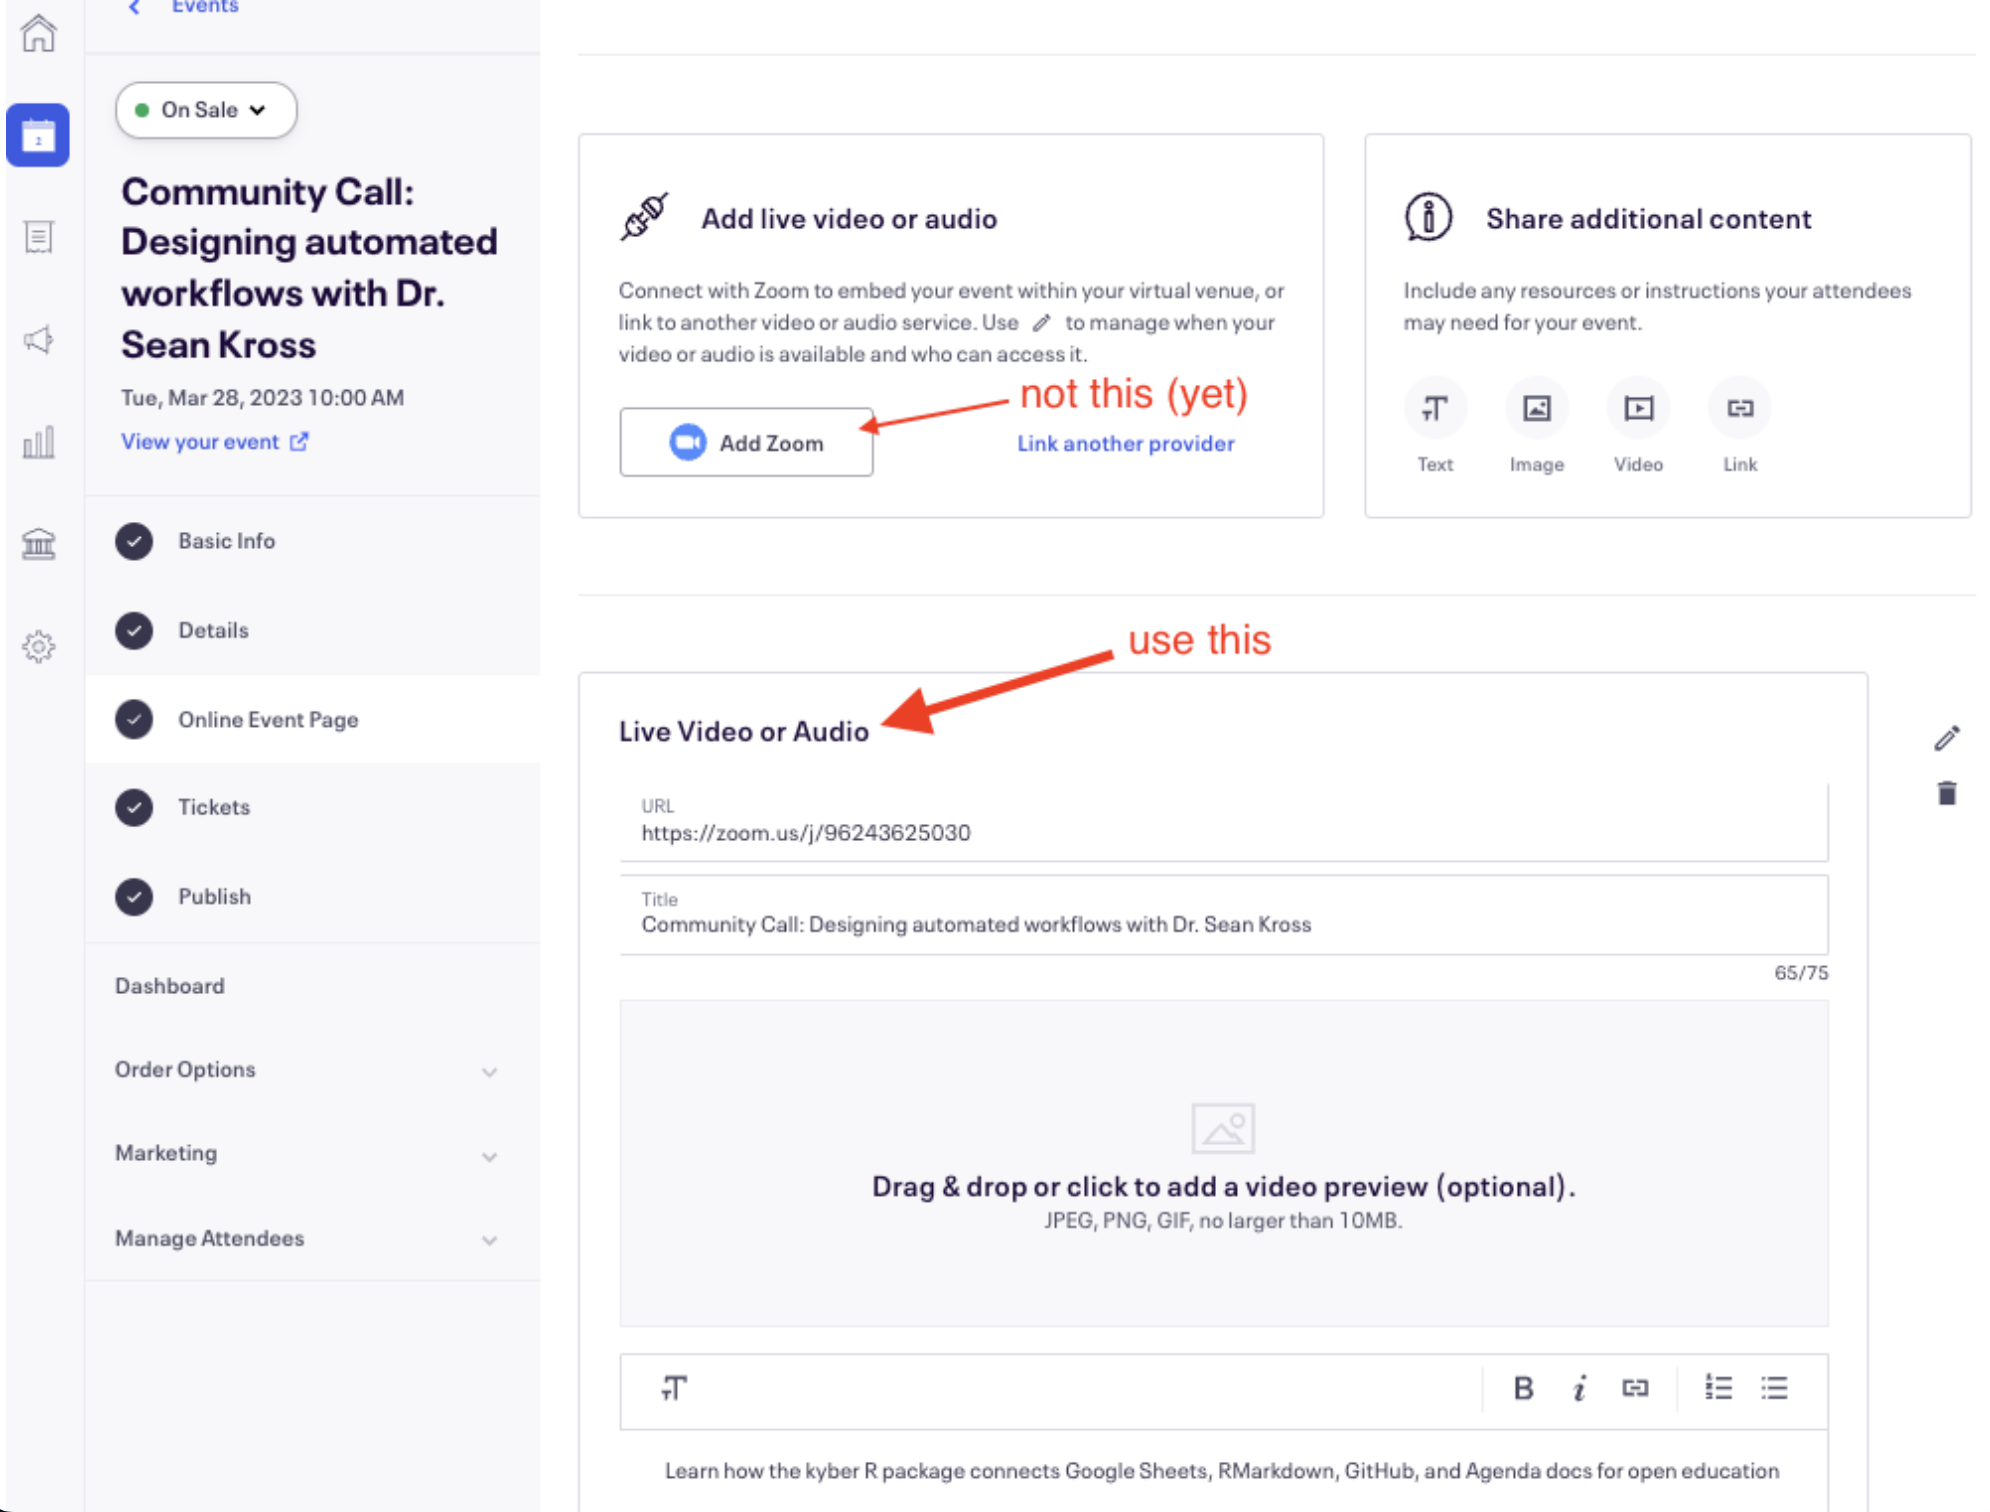
In Eventbrite, create Event > copy Zoom link into Eventbrite > Event > Online Event Page > Live video or audio, instead of “Add Zoom”
- What didn’t work well: “Add Zoom” button, which used “Stefanie Butland’s personal meeting room”, created a mtg in Zoom that has a Zoom registration link, not a clear meeting link. Stumped for now as to how to make that Eventbrite-Zoom integration work.
Create and schedule reminder emails.Eventbrite > Manage attendees > Emails to attendees > create one custom reminder email. Set reply-to as
hello@openscapes.org. Delete other default reminders (Eventbrite makes 3 reminders by default and that’s annoying). For reminder emails in an event series, we must update for every event in the series.We create a custom reminder email with Subject: Zoom link for Openscapes event-name. Body: We’re excited to see you later today! At the session start time (5:00 - 6:00 pm ET), please click to join us in Zoom: LINK. Optional, include event logo or Openscapes logo.
Why a custom email reminder? Several community call participants said it was hard to find the zoom link with Eventbrite’s default reminder email (Stef agrees); that’s why we put “Zoom” in subject line of custom reminder.
GitHub
- documentation, like this Approach Guide
- version control for everything that’s not Google Drive
- coordination with Issues and GitHub Projects
- publishing all our R-based web communications
- comms through website
Repositories tips
When cloning repositories that are large, and we need to make a change in just one specific file (or set of files), we can clone just specific sections of the repository. This can be done the following way:
 git clone --filter=blob:none --no-checkout https://github.com/ronnyhdez/website-new.git
 cd website-new
 git sparse-checkout init --no-cone
 git sparse-checkout set blog/2026-*
 git checkout main
The commands above will place in my working directory just the files under the blog/ folder that start with the year 2026. All the other files from the repository are still part of the repository and the git history, but are not shown on my local working directory.
The --filter=blob:none option avoids downloading file contents until they are needed, while --no-checkout prevents Git from immediately populating the working directory.
The sparse-checkout will set which files are going to appear in our working directory. Finally we populate with just the files we need from the main branch.
Google Workspace
We use an Openscapes Google Workspace. This is our default system for Champions Cohorts, however, we have adapted when required to use MS Teams / Sharepoint.
- Calendar
- Drive
- Docs
- Sheets
- Slides
Zoom over Google Meet
We prefer to use Zoom over Google Meet, which has some limits to functionality e.g. breakout rooms. In Zoom, participants are able to move freely in and out of breakout rooms, if that setting is selected when creating breakouts. In Google Meet, the host must assign people to breakouts either before the meeting via the Google Calendar invite, or during the meeting. If you invite a Google group to a meeting, participants in that group won’t automatically be available to distribute into breakout rooms.
Google documentation: Use breakout rooms in Google Meet.
Google Groups
We use Google Groups when possible to easily email groups of people and / or add them to Google Folders and Calendars invites. Examples: Openscapes Newsletter email to subscribers, Mentors, NMFS Openscapes Data Academy participants. Google Groups work well for people and organizations that use Google products, and not so well for those who use Microsoft products. Not everyone can use their work email or computer to access Google products.
We send emails via Google Group following this procedure documented by Stanford IT:
Compose your email message. In the “To” field of an email message, instead of adding each team member’s email address to your email, just enter the group’s address as a recipient.
Documentation for different applications:
Manual additions to a Google Group are limited to 100 emails per organization in a 24 hr period, i.e. not per workspace manager.
To add more emails at once, such as when we add a large list of newsletter subscribers, the admin can do a bulk upload with a csv file. Google Support how-to.
CSV Format:
Header: Group Email [Required],Member Email,Member Type,Member Role
Entry: yourgroup@email.com, membername@email.com,USER,MEMBER
Mastodon / Bluesky / Twitter
Social media, and specifically Twitter, has been a huge part of growing the Open science community. We’ve taught and written about Twitter a lot in the past.
Mastodon is a social network platform that is free and open-source. It’s been around for quite a while, but many folks migrated there from Twitter. Twitter has tweets; Mastodon has toots. Many open science orgs and communities like The Carpentries and Openscapes are there. For context, some of them posted about their plans/ reasons for moving away from Twitter and toward Mastodon: The Carpentries, rOpenSci.
Here is a Mastodon Quick Start Guide by Yanina Bellini Saibene, Oscar Masinyana, Alycia Crall. rOpenSci posted about: Scheduling Mastodon Posts in R with rtoot and GitHub Actions.
Openscapes has stopped posting to Twitter and now posts to our Mastodon and Bluesky accounts. There are concerns around inclusion about Mastodon and Bluesky as well, and it remains to be seen which social platform will evolve into the place for thriving, safe, inclusive science conversations.
ORCID/Rescognito
We encourage people to create and populate their ORCID (Open Researcher and Contributor ID) profile.
ORCID provides a persistent digital identifier (an ORCID iD) that you own and control, and that distinguishes you from every other researcher. You can connect your iD with your professional information — affiliations, grants, publications, peer review, and more. You can use your iD to share your information with other systems, ensuring you get recognition for all your contributions.
Quicktime video editing
Sometimes we want to edit a Cohort Call recording to remove a section from the middle and keep the start and end segments, e.g. Main room chat during breakouts.
This video says it all: Trimming Clips or Cutting Parts Out of the Middle Using Quicktime (2min 40sec). Briefly:
- make copy of your video to edit
- go to start point of section you want to remove
- use arrow keys for finer navigation
- Edit > Split clip > Done
- go to end point of section you want to remove
- Edit > Split clip > Done
- View > Clips and delete the relevant clip
- Save
Once you delete a section > Done, the clips are automatically spliced together.
Sometimes we want to edit a recording to remove the start and/or the end.
Using Edit > Trim, it can be hard to control how fast the yellow Trim brackets move. Let’s say we want to trim (delete) everything after time 59 mins.
- Go to the 59 min point in the video first
- click Edit > Trim … Yellow brackets appear around the whole video, with a red vertical line - the ‘playhead’ - at 59 mins. The yellow-bracket segment is the part that will be kept
- Type “i” to move the starting point to the playhead’s position (keep the end of the video), or type “o” to make the ending point at the playhead’s position (keep the beginning of the video).
- Click Trim
- Save
ROR - Research Organization Registry
Openscapes was assigned ROR ID ror.org/022je8241 in ROR release v1.67.
ROR is a global, community-led registry of open persistent identifiers for research organizations.
R/RStudio
- all websites and books
- data analysis (R: tidyverse, RMarkdown)
- communications and technical writing (RMarkdown, bookdown, blogdown, Quarto)
- RStudio and GitHub setup instructions
Screen recording
Thanks to Emma Ganley and Sam Csik for versions of this tip.
To make a screen recording without audio, on a Mac, Ctrl-Shift brings up screen recording controls. We need to figure out how to set which screen to record during dual screen use.
To make a screen recording without audio, on a Mac, using Quicktime. File > New screen recording > select options for what to share > to end recording, click Stop icon (black box at top of your screen). We can use the video editing instructions (under Quicktime above) to trim any rough start.
Want to turn your video into a gif to have your screen recording play automatically (instead of having to press play on an embedded video) in a blog post or documentation? Upload your video to https://ezgif.com/video-to-gif/, select the frame rate that most closely matches the length of your video, in seconds.
Slack
Welcome to Openscapes Slack 🤗!
Have you received an invitation to join Openscapes Slack? Here’s some information to help you get comfortable.
About: This is a diverse open science community. We use Slack as a way for people to connect with each other. We want it to be a supportive, trust-based community of folks doing data intensive science. Members include, but are not limited to, people who have participated in a Champions Program, NASA or NOAA Fisheries Openscapes Frameworks, Pathways to Open Science, Reflections, earthaccess contributors, NASA Cloud Cookbook Hackdays, or other Openscapes programs, and their collaborators. Current Slack members can invite others to join - an informal sponsorship approach. These are reviewed and approved by an Openscapes core team member.
How do I use it? Slack can feel like a daunting new tool, especially when we’re introducing lots of new tools during Champions Cohorts. There are both technical and etiquette aspects to getting comfortable. For technical tips see Getting started for new members and How to use Slack. This Slack quick start guide (Woodley and Pratt (2020)) from the Center for Scientific Collaboration and Community Engagement includes 1) configuring your account; 2) channels and notifications; 3) communicating.
When you join, you’ll automatically land in several channels: #welcome, #cool-finds, #events, #general, #random, #shared-joy 🌈. You can browse other channels, like #jobs-funding and choose to join them. People are invariably friendly and open to asking and answering questions. You can get a feel for how things work by “listening” to the discussions, then jump in!
The #welcome channel is a place for new members to introduce themselves and for the rest of us to help them feel welcome by adding an emoji or saying “I work on sea turtles too!”. Here’s a short read on The Value of #Welcome.
If you’re part of a cohort for an Openscapes program you may be invited to a private cohort channel. Open isn’t all or nothing; being open with the peers you’re getting to know is a good way to start getting comfortable with the Slack community more broadly.
Openscapes uses the free Slack plan. This means we can all see message history for the previous 90 days. We do this partly to encourage good open documentation practices: if you are discussing workflow or software development, decisions should be put in (open) documentation and not in Slack.
Channel purposes
These definitions are meant to help people know where to post or ask questions. They are listed in the Slack channel Topic and Description (because the Topic preview is easily visible in the channel, while the Description, not so much).
#welcome: A place for people new to our community to introduce themselves and for the rest of us to make them feel welcome; the default channel that members cannot leave if they leave all other channels.
#general: A place to discuss ongoing progress, friendly Q & A about good enough practices, team culture, tools. Announcements from the Openscapes team and others.
#events: Events that might be of interest to others in our community. Openscapes events also go in #general.
#cool-finds: Posts, datasets, podcasts, repos, papers, videos, packages, …things you found that are cool.
#jobs-funding: Job opportunities, seeking work, offers to connect people with those “on the inside”.
#shared-joy: Sharing joy of any shape or size.
#random: Hallway conversations.
team-openscapes: (private) ~daily checkins. We started this when our team grew in 2024 so that Stef and I weren’t in DMs anymore. Like we did during mentor-coaching, we check in here daily when we’re working on Openscapes stuff to say hi and give a heads up about what we’re working on. For Stef, Andy, and me this is almost daily, for Liz and Ileana, it’s less so and when it’s makes sense for them, since they’re less time. We tag people when they’re needed directly so if it’s better for you to not be notified until you’re tagged that is great too.
Invite someone to Openscapes Slack
Inviting someone to join Openscapes Slack? In an email or other communication, send them the link to Welcome to Openscapes Slack 🤗! and a link to join.
To create a link to join Slack, in the app, Invite people to join Openscapes , choose 🔗Copy invite link. 99% of the time, we do not invite someone by adding their email to invite from inside the Slack app. Why? With the free plan, we are not able to send a custom invitation note from inside Slack, and with our paid plan we were not able to add a URL to a custom note to provide our welcome info.
The channels people join by default are set in the browser admin interface Settings & Permissions > Default Channels. Currently #welcome, #cool-finds, #events, #general, #random, #shared-joy.
Change the email you use in Slack
People change jobs and might want to change the email they use in Slack to continue to use it without creating a new profile. Users can do this on their own. Workspace Owners or Admins cannot do this on a user’s behalf on the free plan. In the app, open your profile (click on your profile icon in lower left to open profile) > click three dots to select Account Settings > This will open your account in the web interface. Click Email Address > expand > add your password and your new email address. (If at first you don’t succeed at this step, try again.) You’ll need to accept the confirmation email sent to your new address.
Set Slack reminders
Here’s an example of how to set a Slackbot reminder for recurring meetings, in this case, biweekly. Add links to “zoom link” and “notes”.
/remind #earthaccess “Our earthaccess hack starts in 1 hour! Here is the meeting zoom link and the notes” at 9AM every other Tuesday
Here’s how it appears in Slack:
“Reminder: Our earthaccess hack starts in 1 hour! Here is the meeting zoom link and the notes”
Slack integration with GitHub
We haven’t implemented this, but the how-to is here.
We’d love for most resource sharing and conversations to happen in the open and in a more persistent location than Slack. Places like GitHub Discussions are great for this. Thanks to Matt Fisher for getting us started with Slack notifications for GitHub Discussions.
We can subscribe Slack channels by repository and event types we’re interested in. In Slack, we can run /github help to get some more info on the command to modify subscriptions. Full documentation.
Example
The Slack #nasa-mentors channel is set to get notified of new and answered discussions for just the Earthdata Cloud Cookbook GitHub repo. The subscription process was started with this command:
/github subscribe NASA-Openscapes/earthdata-cloud-cookbook discussionsThe above will subscribe to “discussions” in addition to undesirable default notifications. We can unsubscribe from the defaults to quiet it down with another comment:
/github unsubscribe NASA-Openscapes/earthdata-cloud-cookbook issues pulls commits releases deploymentsYouTube
Openscapes has a YouTube channel.
Playlists
To make a Playlist, login as Openscapes YouTube Manager. Click on any video to edit Video details. Under Playlists dropdown, you can choose New playlist, and/or select a checkbox to add the video to an existing Playlist. We can add a custom image for a Playlist. Go to that Playlist > hover over the image > click the pencil icon to edit. Playlist image must be at lease 640 x 360 pixels.
Upload a video
- Check beginning and end of video to see if it needs to be trimmed. To edit a video, see Quicktime video editing
- Log in to YouTube as @openscapes (not e.g. stefanie @openscapes.org)
- Click Create in upper right corner -> Upload video
- Drag and drop or select video
- Fill in title and description. Note can’t hyperlink text in title or description; add url as text. Add links to relevant resources and credit the presenter and their organization.
- Choose a thumbnail - autogenerated usually works well
- Select playlist(s) (e.g. NOAA Fisheries Openscapes + NASA Openscapes)
- Click Next
- Video elements - generally no actions required here
- Click Next
- Initial check - Sometimes checks flag copyrighted songs. “Community Guidelines check” took a long time
- Click Next
- Choose visibility: public
- Click publish
- Copy YouTube link and share.
Zenodo
We cover a lot here - the Zenodo Openscapes Community, getting a DOI, guidance for citing our work. See the subheadings in the navigation bar to the right to jump to a section.
We want to share our material in a way that other people can find it, use it, improve it, and cite it. For our lesson materials, like Champions Cohorts, this provides a robust way for people to add their participation to their CV as professional development. We use the Zenodo repository and a Zenodo Openscapes Community for this purpose.
Zenodo is a general-purpose open repository that allows researchers to deposit research papers, data sets, research software, reports, and any other research related digital artefacts. For each submission, a persistent digital object identifier (DOI) is minted, which makes the stored items easily citable (adapted from Wikipedia). Zenodo allows for versioning and we can preserve GitHub repositories in Zenodo. GitHub itself is not a repository. For the full picture, this 1-hr webinar is helpful: Zenodo: open digital repository | 2022.12.07.
We created a Zenodo Openscapes Community as a “semantically meaningful group” of research products using these example Zenodo Communities as inspiration: NASA’s Transform to Open Science; Center for Scientific Collaboration and Community Engagement (CSCCE).
Zenodo has a Sandbox in which one can create and refine a draft Community before creating the real thing. This webinar section “How to create a community” screenshares a walk-through that makes things crystal clear. Creating a Sandbox first forces you to recognize decisions to make before creating the real thing, like: needing to create it from an account that looks professional like “curator”, rather than a personal email username; or deciding what types of research products to include.
What do we curate in our Zenodo Openscapes Community?
Anyone can request to have their Zenodo record listed in the Zenodo Openscapes Community. Curator is Stefanie Butland via curator@openscapes.org. We don’t want to include everything; too big and its value diminishes. We do curate:
- Resources on GitHub like the Openscapes Champions Lesson Series, NASA Earthdata Cloud Cookbook, Pathways to Open Science
- make a “release” on GitHub and submit that to Zenodo, choose type = other, or lesson. See instructions in Documentation.
- key blog posts like ESIP 2022, 2023 panels
- create and upload pdf of post from the website, choose type = other
- slide decks from key presentations
- upload pdf of slides, choose type = presentation
We do not curate datasets.
How to add your existing Zenodo record to the Zenodo Openscapes Community
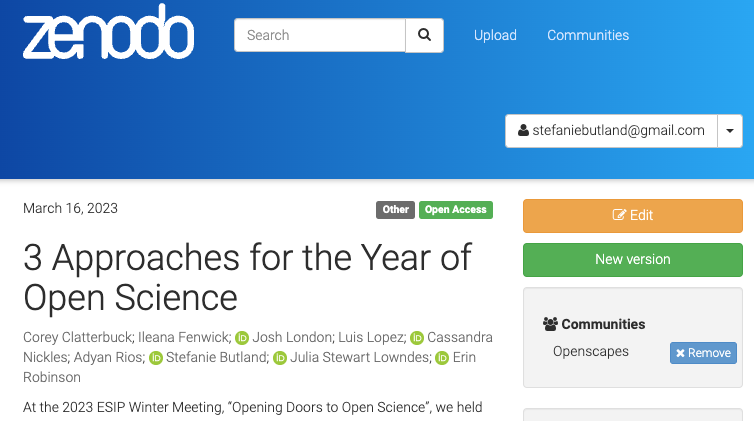
If you own an existing Zenodo record you’d like to have listed, log into Zenodo, go to that record’s page, click yellow Edit button (top right) …
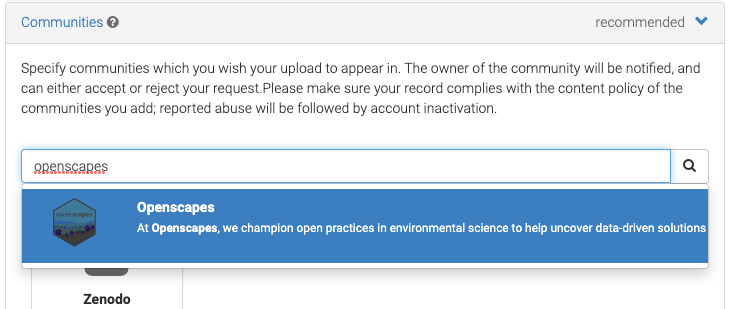
In the Edit page that appears, scroll to Communities section > type “openscapes” and select it …
Click Save > click Publish (these appear at top and bottom of the edit page)

curator@openscapes.org will get email notification of your request and accept, or may ask for further information.
How to publish a new record in Zenodo to get a DOI
Video tutorial from OpenAIRE_eu (4.5 min)
For a blog post or presentation, save as pdf, filename: openscapes_post_name_year.pdf or slides_name_year.pdf, example: openscapes_post_noaa_afsc_2022.pdf
Login to Zenodo (login via GitHub is convenient), go to https://zenodo.org/deposit/new?c=openscapes and upload your pdf (files > start upload). Using that link automatically includes your record in our community collection.
Upload type
- blog post: Other
- slide deck: Presentation
Basic information
- Digital Object Identifier: leave blank
- Publication date: date of blog post publication, or presentation
- Title: title of post or presentation without adding version number
- Authors / creators:
- We can take advantage of back-end system links between Zenodo, ROR (Research Organization Registry), and ORCID to auto-complete names, ORCID IDs, and affiliations that will automatically appear in Zenodo records. Openscapes was assigned ROR ID ror.org/022je8241 in ROR release v1.67.
- Start typing the author’s name and select from a list of auto-complete options. If none is available, use author name consistent with other Zenodo records in their name; manually add their ORCID ID.
- Author’s affiliation: Start typing the affiliation name. For Openscapes and other orgs registered with ROR, you will see a dropdown list that includes one annotated as
Source: ROR (preferred). Select that one to autocomplete. This will result in a ROR logo and link to Openscapes ROR record being linked in their affiliation (click ‘show affiliations’ in this example). - We keep a list of Openscapes authors ORCID IDs in
OpenscapesParticipantsMainListGoogle sheet, Mentors tab - If the person has granted ORCID permission to auto-update from Zenodo, this new record will automatically appear in their ORCID profile. This is a pretty great bonus.
- Description: for an Openscapes blog post, use the italicized preface; for a presentation, use the abstract. End with “Link to source blog post: URL”
- Version (optional): We’ve settled on using CalVer: YYYY.0M (zero-padded month) since Luis López said “I like CalVer for books and environments” when we asked for advice. It’s a bit redundant with publication date.
- Keywords: To promote findability and consistency, we suggest using some of these keywords, based on those used by related records. Wow, keywords appear to be case sensitive. Search keywords:“Open Science” gives 1770 records; keywords:“open science” gives 1395 records; keywords:“open science” OR “Open Science” gives 11112 results (not sure why those don’t add up) (May 23, 2023)
- Openscapes
- Open Science
- NASA
- NOAA
- JupyterHub
- cloud computing
- conference name e.g. ESIP, AGU, SORTEE, FORCE11
- Open Educational Resources (for lesson series)
License: Open Access, Creative Commons Attribution 4.0 International
- For GitHub releases that include code and documentation, we include a LICENSE.md file on GitHub, then on Zenodo we select Licence: Other (Attribution).
Funding: Would be great to add this, but we’ve not established guidelines yet
Publish! At very top or very bottom, right side of the page, click Save > Publish > I understand. Voila! Your Zenodo record is live.
- The Zenodo Openscapes Community curator will be notified via email to approve inclusion of your record in the community.
- You can edit things like keywords and the Cite as text without affecting the DOI. To make a change to the file(s) itself, you must upload a new version which will give a new DOI.
How to get a DOI for materials on GitHub
This section describes how to get a DOI for a “research related digital artefact” like our Quarto books on GitHub; it’s a work in progress, but should get you what you need.
We follow Metadocencia’s How-to Guidance by Yanina Bellini Saibene. It’s clear, has great annotated screenshots, and is also available in Spanish. Here are some specifics for us:
Store the material in a repository that allows us to publish it, like GitHub.
Add an open license that makes it clear how people can use the material. The Openscapes Approach Guide license is adapted from The Turing Way license that accommodates works that include both code and documentation.
Connect your GitHub Organization to Zenodo (we have already done this). This means that when we make a GitHub Release of our material, a Zenodo record with a DOI is automatically created.
Make a GitHub Release of the material. Go to
/releasese.g. https://github.com/Openscapes/pathways-to-open-science/releases to create a release because it doesn’t appear on the right of repository page automatically.Review and edit the Zenodo record that has been automatically created.This will likely involve editing the authors, their ORCID IDs, their affiliations. It’s best to find a author’s name by using the search. Selecting a person from the resulting list will add their ORCID ID. It’s important to find affiliations by using the search. Typing ‘Openscapes’ gives you a list to select from; choosing from that list ensures that the Openscapes affilation links to our ROR (Research Organization Registry) record. Save and publish the changes.
Add a “how to cite” section to the resource for which we’ve now got a DOI.
Add Citation guidance to Openscapes materials
Once we have a DOI, we need to let people know how to cite our resource. We like using Citing The Turing Way as an example to follow.
We add a ‘Citation’ section to the Welcome page, and a Zenodo DOI badge to its README on GitHub. Example: Here’s how we cite this Approach Guide and show its Zenodo badge in the README.
The “Cite as” section in a Zenodo record, in the right-side navigation bar allows you to copy-paste the citation in several formats. To get the markdown format for the badge, we click on the badge itself on our record’s Zenodo page; clicking on the ‘copy to clipboard’ symbol gets you only the URL for the record (which is why it’s really easy to forget how to get the badge info). The code to add a badge looks like this: [] (https://doi.org/10.5281/zenodo.8034313)
Zoom
We use Zoom as our primary meeting tool and for registrations for events that will be held via Zoom, such as Champions Cohorts, Community Calls, and the Pathways to Open Science series. Below are instructions for event registration, and for sharing audio in a Zoom meeting.
Create a Zoom link for a meeting
To create a Zoom link for a meeting, it’s best to do it from inside the web interface: https://zoom.us/profile.
“Schedule a meeting” button: click
For evergreen link:
Recurring: click. Then:
“No Fixed Time” from dropdown menu
- Mindset: zoom link is for the concept of a meeting “NASA Mentors”, not for date-times. So “no fixed time”. Gives us flexibility to move a meeting in calendar.
“Allow participants to join any time” > click
Topic: use topic name consistent with title in Google Calendar. (even if not connected)
Our practice
In Openscapes’ Pro account, one person can only host one meeting at a time. Said differently, if one person created 2 overlapping meetings and listed an alternate host, the first person to start that Zoom is fine (whether they are main or alt host), while the second person will not be able to start their meeting.
So, when we have 2 overlapping meetings, 2 different account holders must each create a Zoom meeting. We have learned to be judicious about who creates a Zoom meeting / link, based on who is the likely lead of that meeting. We can and should set one (only one) alternative Zoom host in the interface, allowing that alt-host to start the meeting if the meeting host is unable to.
In the web interface, an account holder is not able to see meetings created by another account holder, but we can now see each others’ cloud recordings if we are set as alternate host.
We use Waiting room, not password.
Don’t have Zoom connected to GCal: yes this could be connected by giving Zoom all permissions to contacts but we’d rather have this friction than do that.
Do not reuse a zoom link: don’t want to conflict with an existing meeting (more worried about that than zoom bombing because waiting room)
For any Zoom link you create for a recurring call: update the crumb trail
Add it to the calendar invite
Add to the relevant Agenda doc
Add to Core Team Doc, at top in our listing of Zoom links for recurring meetings.
Event registration
We can set up registration for a single event like a Community Call, or for a series like Pathways to Open Science.
- Create a meeting. Check ✔️ ‘Recurring meeting’ for a series.
- Check Registration ✔️ Required > ✔️ Attendees register once and can attend any of the occurrences
- Options > Show > Alternative Hosts: add someone else who has Openscapes Zoom license
- Save
- The ‘Registration Link’ is the URL we add to an event page.
- See Registration tab; defaults are ok
- Click Branding tab > Logo: upload Openscapes hex; Banner: use a banner image from the Openscapes website
- Click Email Settings tab > Edit Confirmation Email to Registrants; use ‘Send me a preview email’ to check and iterate on the content
Each person who registers receives a unique URL for the Zoom meeting. Do not share that link, since every person using it will be signed in with one person’s name (ask us how we know ;-) ). The root of that link is the generic url anyone can use to join e.g. a speaker who did not have to register, or to post last minute in Slack for a Community Call.
View registrations and participants for an event
View a list of registrants. No option to export the list here.
Meetings > select a meeting (click title/date, not Edit)
Registration tab > Manage Registrants > click View
Export a csv file of registrants
This one is not intuitive. H/T Emily Anderson of Coiled.
ADMIN > Account Management (near bottom of left nav bar) > Reports > Meeting
Enter date of event, Select Registration Report > ✔️ Check event > Click Generate
Click Download
Export a csv file of participants
Also not intuitive … because there are 2 sections called ‘Reports’ : one under ADMIN we use for registrants, and this one under PERSONAL for meeting participants
PERSONAL > Reports > Usage Reports > Usage
Search narrow date range for event > scroll to right to see Participants > click number of participants shown > Export with ‘Show unique users’ and ‘Export with meeting data’ selected
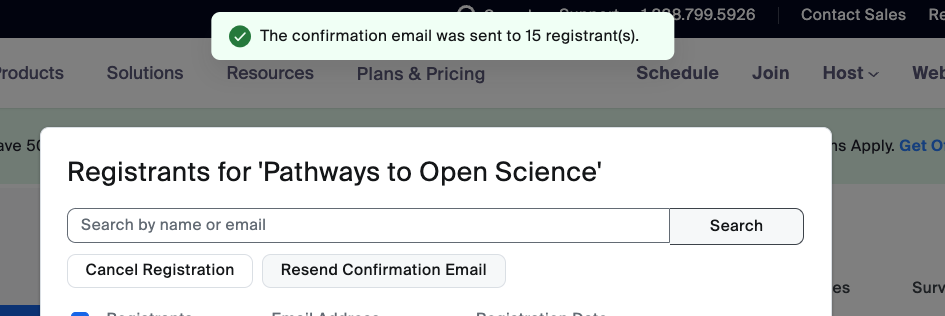
Resend confirmation emails to registrants
Imagine people have registered and received their confirmation email with their unique Zoom link weeks in advance of your event. When it’s time to join, how do they find the link?
This must be done semi-manually. In Zoom web portal > Meetings > your meeting > Registration > Manage Registrants > View > select Registrants checkbox to select all registrants on that page > Resend Confirmation Email button. Repeat for each page of registrants. (See also Zoom Support article; this pointed me in the right direction but said we had to send every single email separately.)
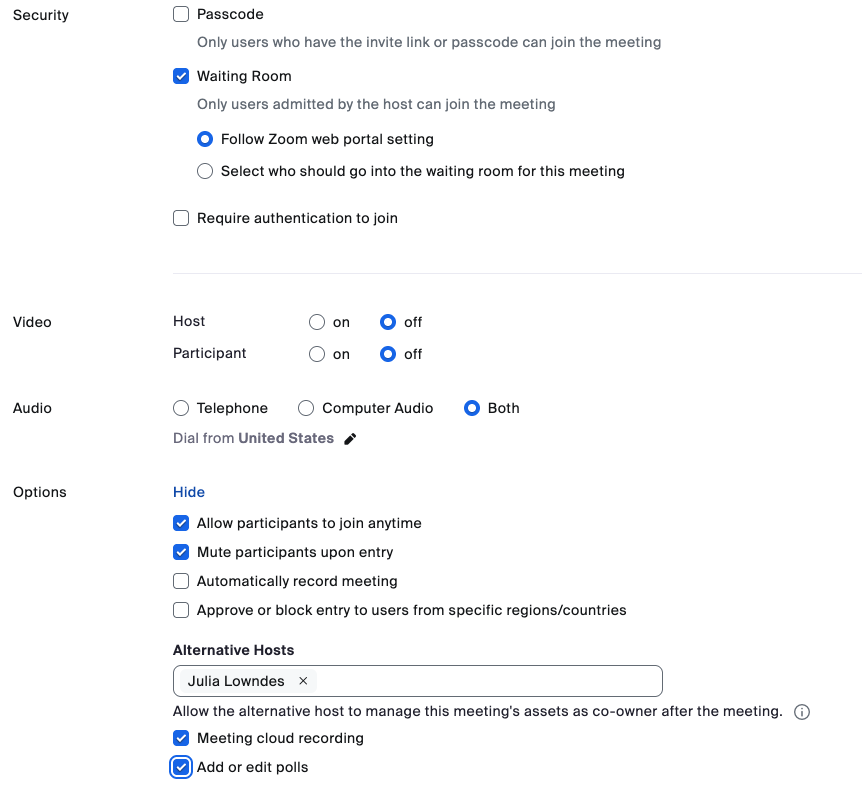
Sharing audio in Zoom: Two scenarios
This Zoom resource covers two scenarios we use: Sharing computer sound in a screen share. Screenshots below. Practice both beforehand, testing by recording yourself, because they’re not obvious and chances of working smoothly on the fly in a meeting are …low.
Scenario 1. During start of meeting, sharing welcome slides in a loop, with music from spotify playing so audience can hear, and people speaking does not disrupt music. See How to share audio with shared visuals.
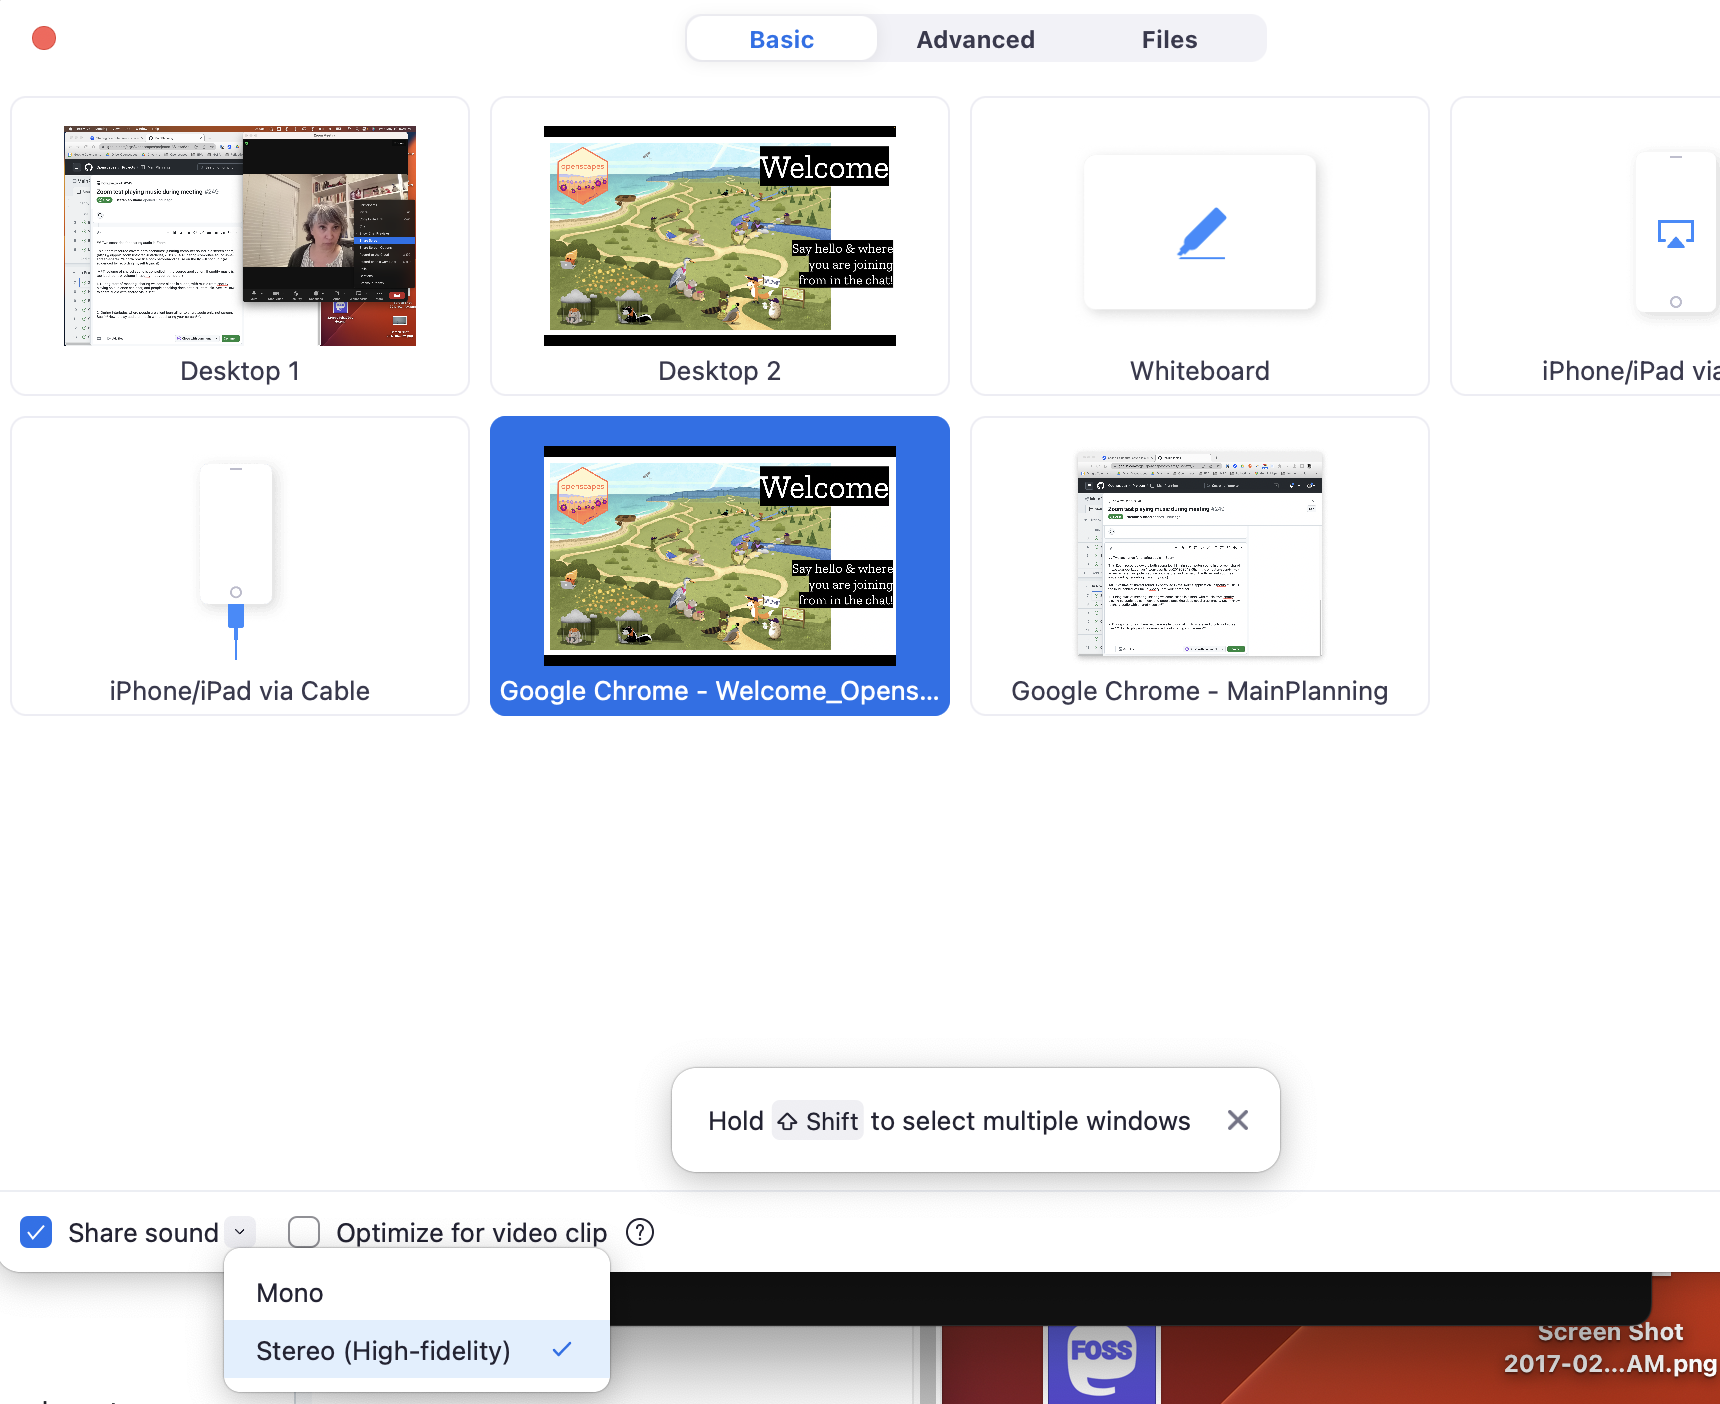
Scenario 2. During interludes where people are silent journaling, to share audio only, not screen. See How to play audio or music without sharing your screen.
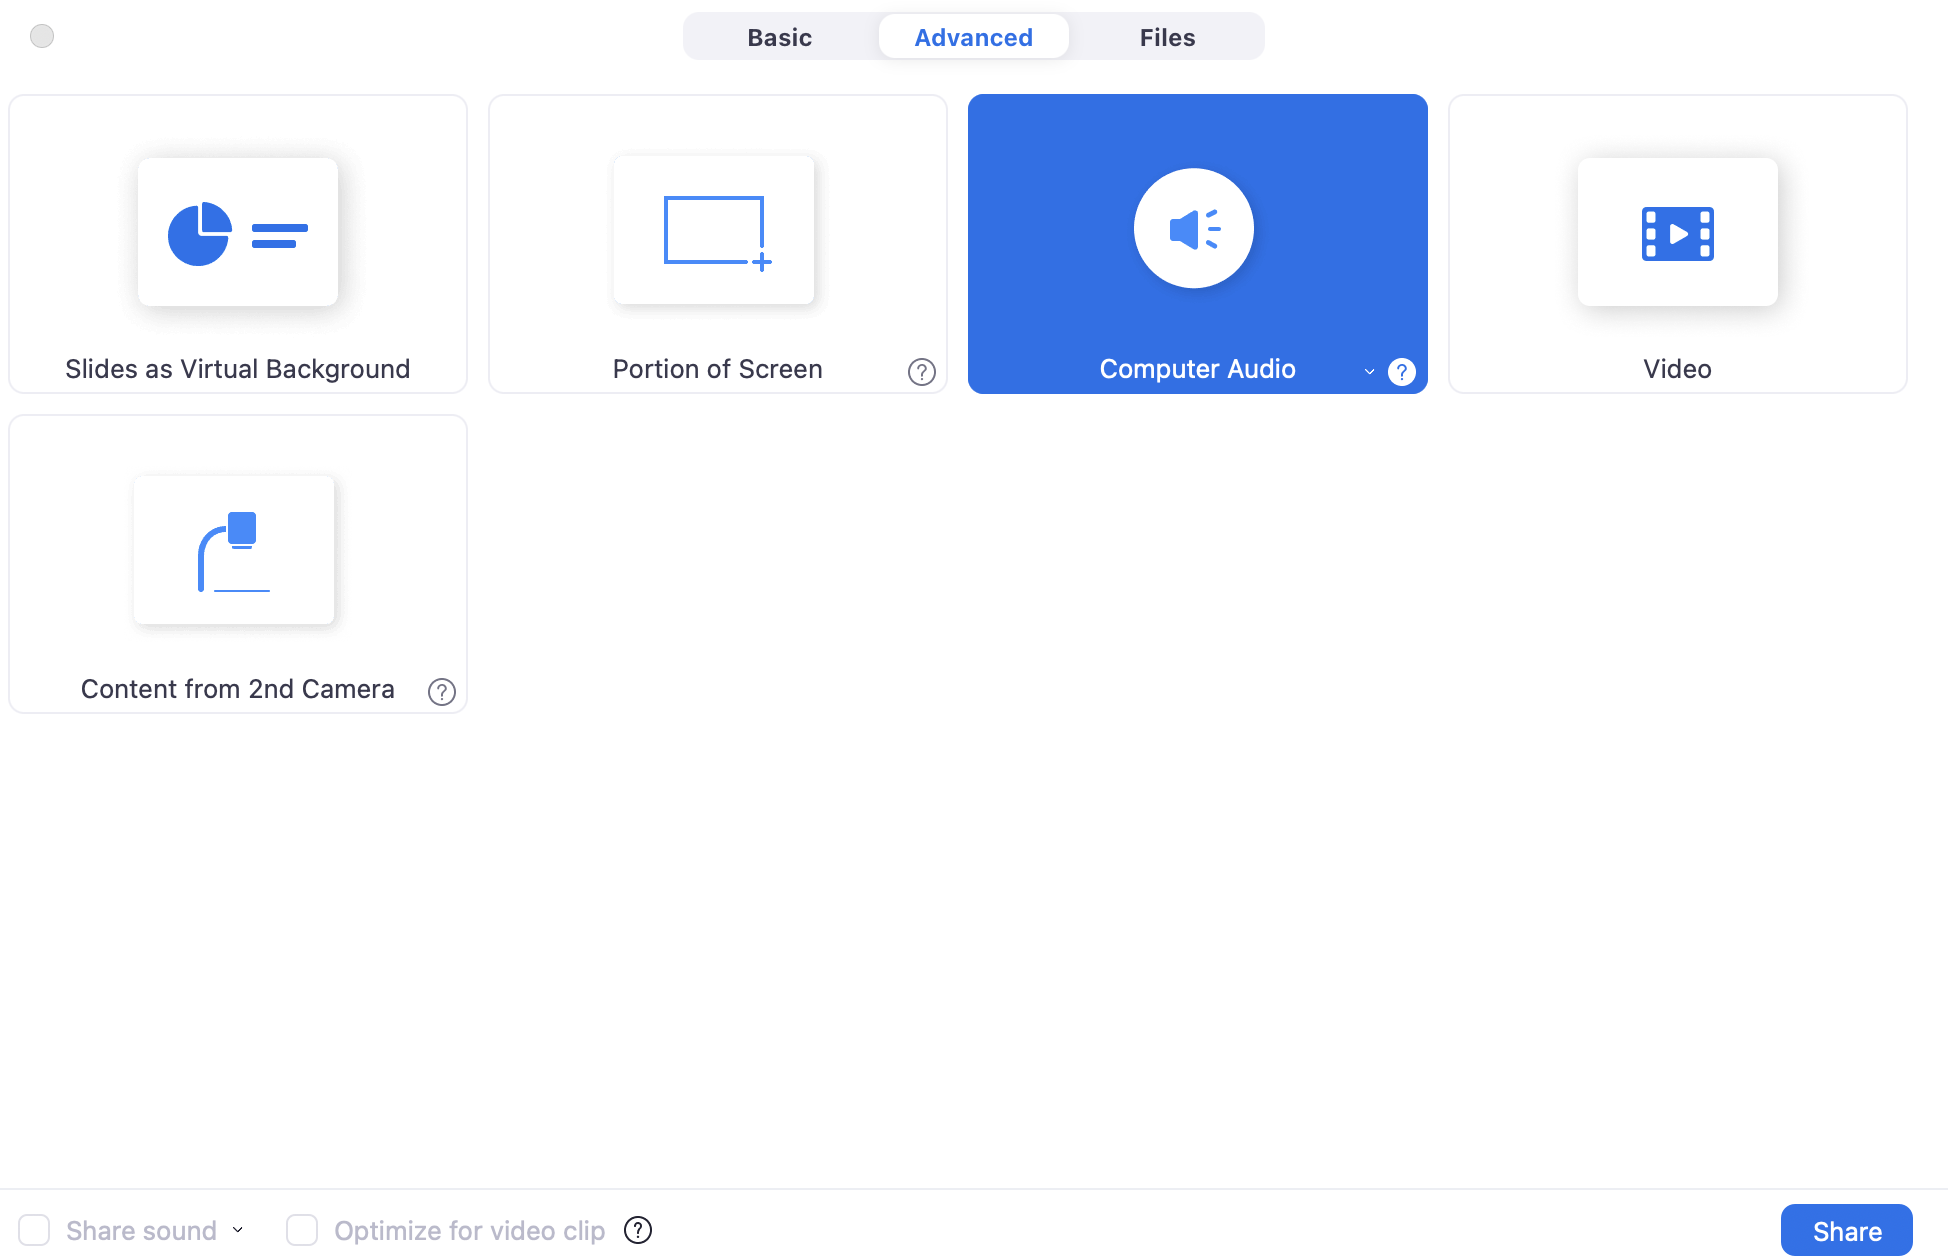
IMPT: volume of shared sound is controlled in the source application. If spotify music is too loud, control volume in spotify (not your computer). See How to control the volume of a shared sound while in a meeting
Zotero
- https://www.zotero.org/
- Login from browser
- Download desktop app and Zotero Connector to Firefox or your preferred browser
- Quarto uses Zotero locally from the app, not from the web. Login to sync from our Openscapes Zotero library on the cloud, and then Quarto should be able to find them. There is a button in Zotero app to sync to a connected cloud library, if it does not happen automatically.
In our Openscapes group library, we have resources not limited to academic articles, but also youtube videos, blogs, teaching resources, and more.
Code snippets
Snippets of useful code for things like managing lists of participants in our Google sheets