From RStudio
The RStudio software (called an IDE, integrated development environment) is an excellent way to edit files and interface with GitHub. Plus, as it is made by the same folks who make Quarto, it has many integrated features for streamlining your workflow with Quarto, including how it previews your edits and provides debugging support for yaml! Quarto's RStudio tutorials has great instructions on getting started with RStudio, including computations and authoring.
Here is what you’ll need to do to set up and use RStudio with Quarto.
Setup
RStudio and GitHub
For a workflow with RStudio and GitHub on your local computer, you will need four things:
- R
- RStudio
- Git
- GitHub
Follow the UCSB MEDS Installation Guide for detailed instructions on how to create accounts, download, install, and configure on Mac and Windows. This takes about 20 minutes. (For an even more detailed walk-through, see Allison Horst’s ESM 206 Google Doc).
Clone your repo
You’ll start by cloning your repository into RStudio.
File > New Project > Version Control > Git > paste your repository name.
R for Excel Users: Clone your repository using RStudio has detailed instructions and screenshots of these steps.
Install Quarto
Next, you’ll install Quarto: https://quarto.org/docs/get-started/. After downloading, follow the installation wizard on your computer. When it is complete, you won’t see an application or any new software, but it is now available to RStudio (as well as all other applications on your computer, including the command line).
RStudio orientation
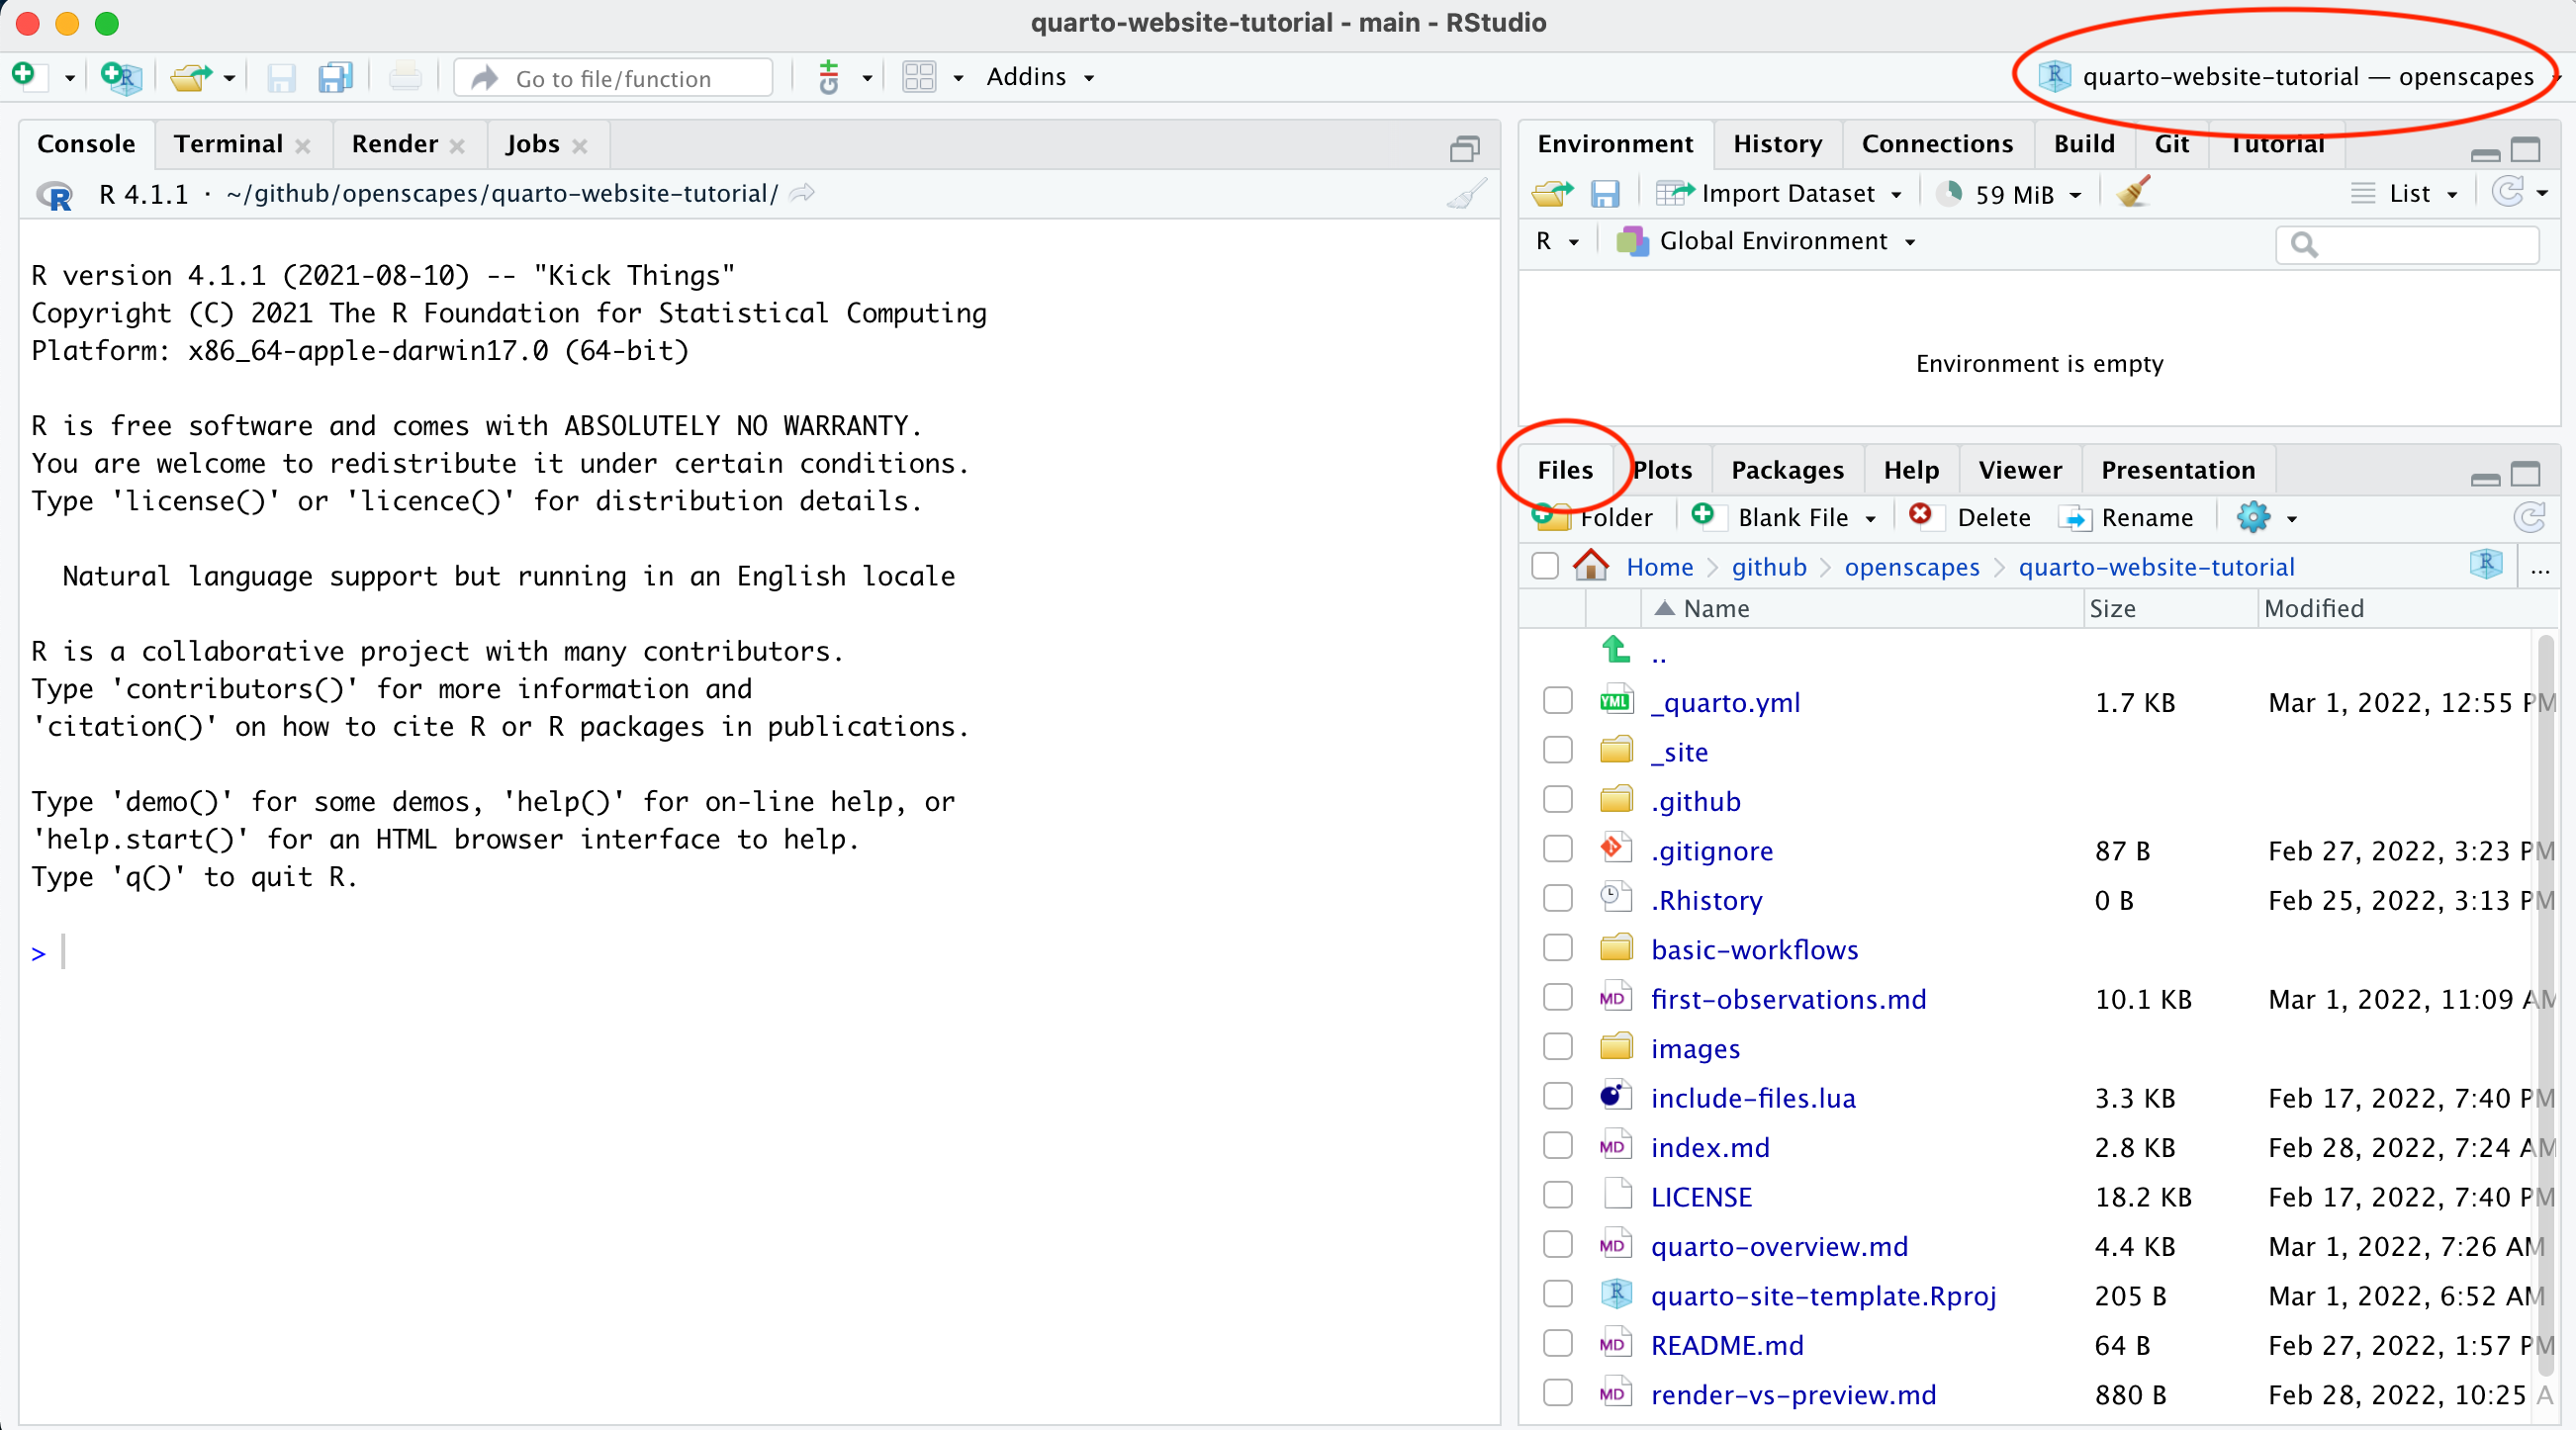
Now let’s take a moment to get oriented. This is an RStudio project, which is indicated in the top-right. The bottom right pane shows all the files in your project; everything we’ve cloned from GitHub. We can open any RStudio project by opening its .Rproj file, or from RStudio File > Open Project ….
Visual Editor
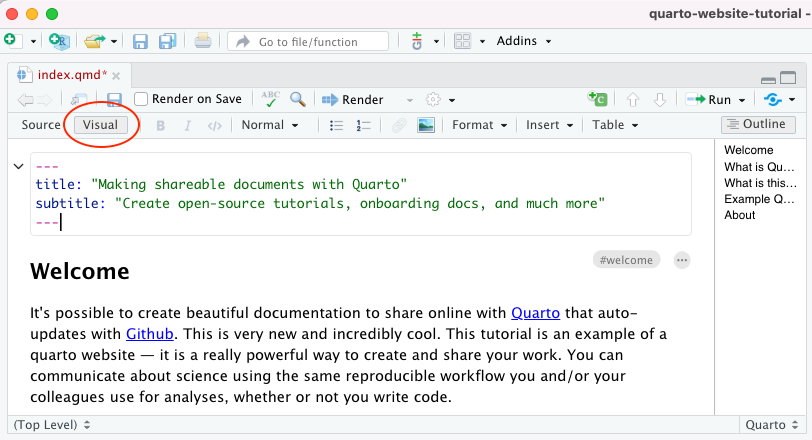
The RStudio Visual Editor is quite new and has features that improve your writing experience. Working in the Visual Editor feels a bit like working in a Google Doc.
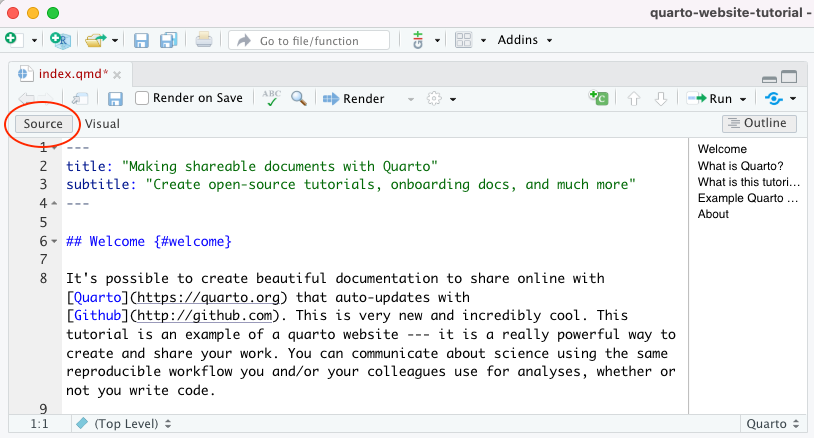
Here’s an example showing the same file in the original Source Editor with content in markdown format and in the Visual Editor with content that looks more like it will appear in a live site. You can switch freely between these modes.
Already have some content formatted in a Google Doc? You can copy-paste it into the Visual Editor and most formatting will be retained.
The editing bar provides familiar point and click access to text formatting options like bulleted or numbered lists.

Keyboard shortcuts
The Visual Editor also lets you use many keyboard shortcuts that might be familiar for adding boldface (command-b), italics (command-i), or headers. On a Mac, option-command-2 will make a level 2 header. Try it with option-command-1, or option-command-0 for normal text!
Insert an image or figure
To insert an image (called a figure in Quarto), click the image icon. This brings up a window in which we can select the image, set its alignment, give it a caption and alt text, hyperlink it, or edit other metadata.
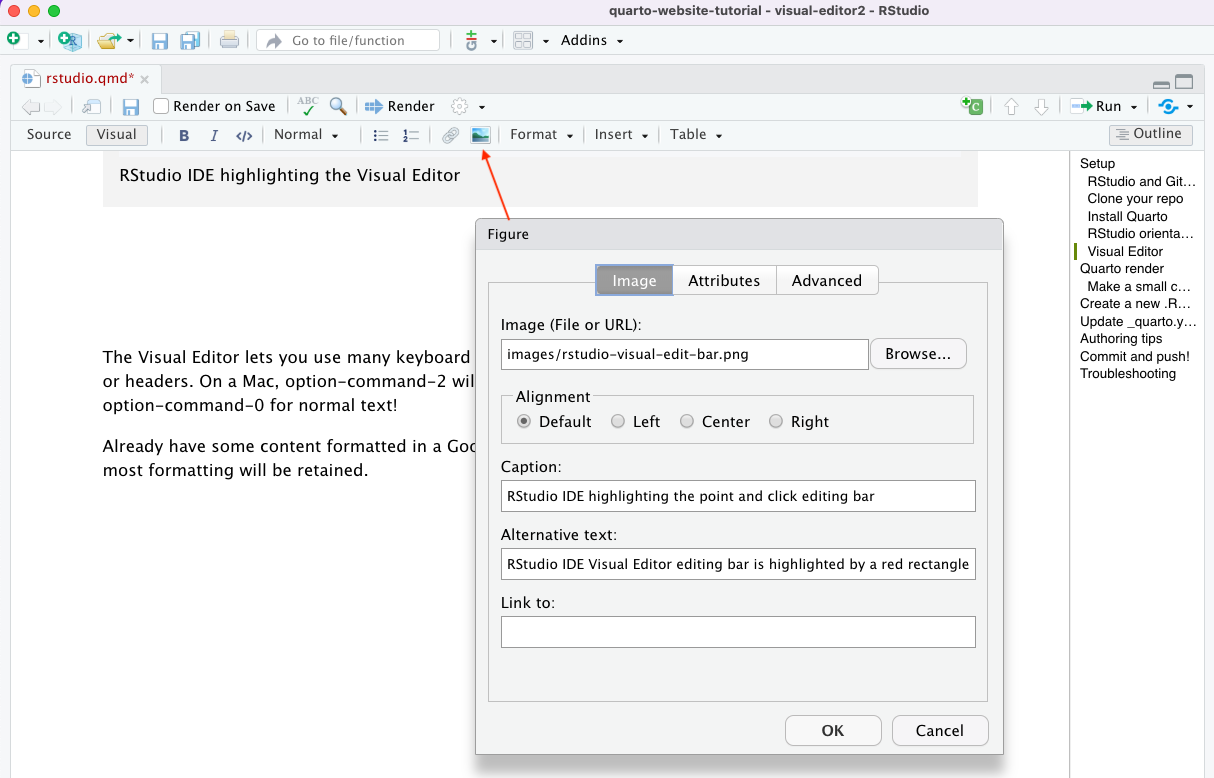
Once an image is added, clicking on that image gives us editing options. We can resize it dynamically by clicking in the image and dragging a corner or side to resize. When an image is selected, its dimensions are displayed for editing. Clicking on the gray ellipsis to the right of the dimensions opens the pop-up window to access more metadata edits.
Insert a table
Similar to adding an image, to insert a table, we click the Table dropdown.
Quarto render
In the Build tab in the top-right pane, click “Render Website”. This will build the .html files and preview your website. It’s equivalent to “knitting” in RMarkdown.
Note that you can also click “Preview Website”. With “Render Website” in RStudio, Quarto is able to render and preview in one step.
If you’d ever like to stop the preview, in the bottom-left, click on the Jobs tab and then the red Stop button.
Make a small change and render it
Click on index.md. This will open this markdown file in a fourth pane; the editor pane. Make a small change, for example change to today’s date on Line 4. Then, save your file; there is a disc icon at the top of the file.
Then, render this file: press “Render” which is to the right of the disc icon that saves the file. This will render only this single file, as opposed to rerendering the whole website like when we clicked “Render Website” in the top right pane. Checking Render on Save (between the disc icon and the Render button) is a great strategy for doing this in one step.
Create a new .Rmd page
New > RMarkdown document > OK
The starter RMarkdown document has some R code inside: it displays a summary of the cars dataset that is pre-loaded into R (summary(cars)) and plots the pressure data that is also pre-loaded (plot(pressure)).
Save this document as r-example.rmd.
Update _quarto.yml
Now we’ll add r-example.rmd to our _quarto.yml file; this is where we register all files to include in our site. Let’s add it after the section called “Quarto Workflows”.
Open _quarto.yml by clicking on it from the file directory.
Scroll down to review the current contents in the sidebar: section under contents:. It’s there we see all the file arrangement that we see in the previewed site.
Add - r-example.rmd in its own line, making sure that your indentation aligns with the other pages.
From the Build tab, clicking Preview Website will recreate your website!
Commit and push!
Committing and pushing will make the changes you see locally live on your website (using the GitHub Action we set up earlier).
Troubleshooting
If you have trouble rendering your website after for example changing the extenstion of a file from .md to .qmd, refreshing your RStudio often helps. Do this by clicking the project name at the upper right of the RStudio window (in this case, quarto-website-tutorial), and underneath the “close project” section, click the same name of your project: quarto-website-tutorial. This will relaunch your whole project afresh.