Installation
You can install Kyber using the remotes package:
To install the latest release version from GitHub:
remotes::install_github("openscapes/kyber@*release")To install the development version from GitHub:
remotes::install_github("openscapes/kyber")Overview
Kyber contains tools for setting up learning cohorts on GitHub, purpose-built for the Openscapes Champions Program.
-
init_repo()initializes a local git repository and new GitHub repository with a README.Rmd, a code of conduct, and a gitignore. -
create_github_clinic()creates all of the files you need for teaching a GitHub clinic. -
create_team()creates a new team on GitHub. -
add_team_members()adds members to a team on GitHub based on their GitHub usernames. -
add_team_to_repo()adds a team to a GitHub repository. -
call_agenda()creates agenda documents for each individual Cohort Call.
Quick Cohort Setup
The Big Picture
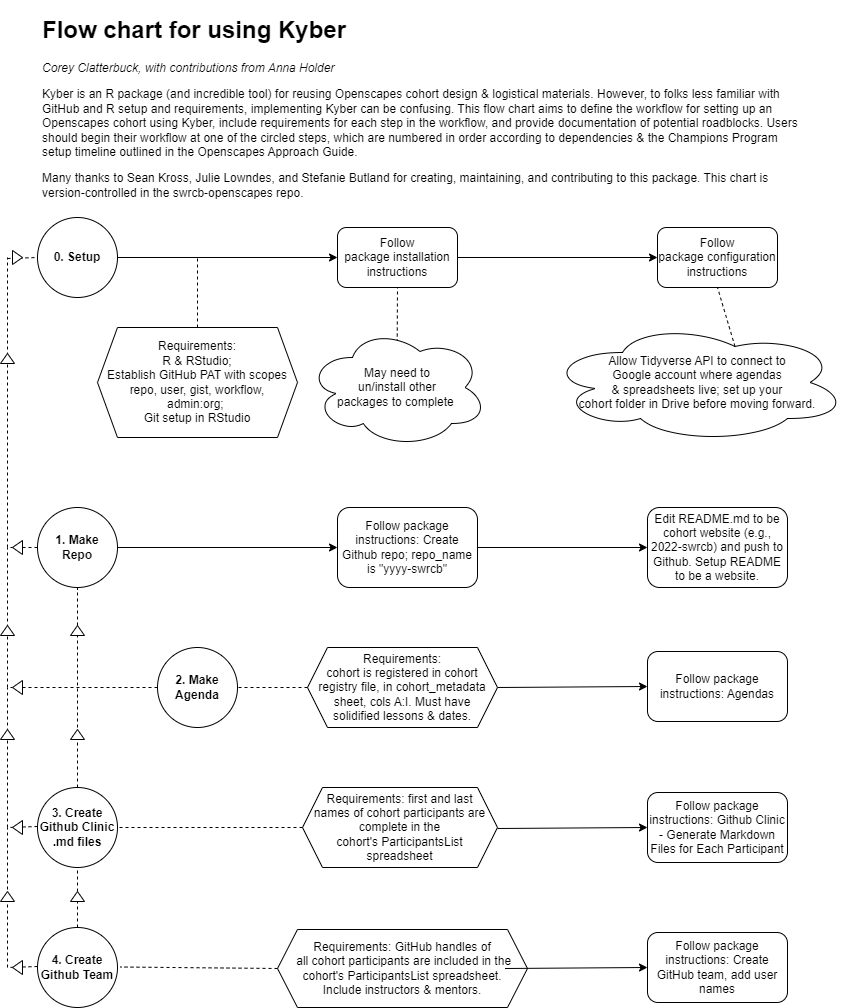
The chronological steps for creating Openscapes repos and materials using Kyber are detailed in the ReadMe. See this flow chart for understanding how these steps fit together, including the requirements to complete each step. (Kyber flow chart pdf)
Configuration
Using Kyber requires more configuration than most R packages since Kyber functions automate processes on GitHub that you would normally do by hand.
First, make sure that you have googlesheets4 installed and that you have authorized your computer to read from Google Sheets. Run the following to test your configuration settings:
library(googlesheets4)

cohort_registry_url <- "https://docs.google.com/spreadsheets/d/1Ys9KiTXXmZ_laBoCV2QWEm7AcnGSVQaXvm2xpi4XTSc/"

read_sheet(cohort_registry_url, sheet = "test-sheet")
For creating the GitHub Team and adding usernames, Kyber requires you to set up a GitHub Personal Access Token with scopes for repo and admin:org. See the GitHub PAT documentation for more information about how to generate your PAT. You can create your PAT with usethis::create_github_token() with their defaults, plus admin:org. Please make sure that you do not share your PAT or commit it to a Git repository, since anyone with your PAT can act as you on GitHub.
library(usethis)
library(gitcreds)

create_github_token(
  scopes = c("repo", "user", "gist", "workflow", "admin:org")
)

gitcreds_set()
Example Workflow - Champions Cohorts
This workflow often happens in 4 separate stages:
- create the repo and readme (pre-cohort)
- create agenda documents before each Cohort Call
- create
github-clinicfiles (days before GitHub Clinic in Call 2) - create github team and add usernames (day before Clinic, when we have all usernames)
1. Create GitHub repo with README
Creating a repo creates a local folder with README.Rmd
library(kyber)
library(rmarkdown)
library(tibble)
library(fs)

repo_name <- "2021-ilm-rotj"

# This will open a README.Rmd for you to edit
# In yaml of README.Rmd, `cohort_name:` will be automatically filled in based on `repo_name`.
# Default organization for repo is openscapes. To initialize the repo in another org,
# specify org name as in `init_repo("repo_name", org = "nmfs-openscapes")`
repo_path <- init_repo(repo_name)

# Then render the README.Rmd to README.md
render(path(repo_path, "README.Rmd"))

# To create a readme independently of creating a repo use: `kyber::create_readme()`, which is called by `init_repo()`. Then knit the README.Rmd to README.md.

# We still need to work out the next part of the workflow and the extent to
# which it should be automated, but I imagine something like:
#
# 1. Move README.Rmd out of this repository to another repository that perhaps
# only contains README.Rmds.
# 2. Git add, commit, and push in the repo that only contains README.Rmds.
# 3. Git add, commit, and push in this repository.
2. Create Agendas
Ensure cohort_metadata is complete in the Cohort Registry sheet, including cohort_website, google_drive_folder and cohort_name_long. These will appear in the Agendas.
library(kyber)
library(googlesheets4)

kyber::call_agenda(
    registry_url = "https://docs.google.com/spreadsheets/d/1Ys9KiTXXmZ_laBoCV2QWEm7AcnGSVQaXvm2xpi4XTSc/edit#gid=942365997",
    cohort_id = "2022-nasa-champions",
    call_number = 3)
The following suggestions aid next steps as of July 14, 2022:
2.1 Move agenda to Google Docs
- In RStudio, Knit (or PreviewHTML) the resulting
agenda.mdcreated from the code above and copy-paste the result into a Google Doc (example: 03_CallAgenda [ 2022-noaa-afsc ]. You might need to to expand the knitted preview into the browser to get it to copy/paste correctly into Google Docs. - Move Google Doc to Openscapes Workspace folder Openscapes_CohortCalls [ year-cohort-name ].
2.2 Formatting your agenda
- Select all (cmd-A) and change font to Open Sans
- Make p1 opening text 9 point font (the text above horizontal line & Call title)
- Make Header 1 font 18, bold; update heading 1 to match (see screenshot below; Stef notes “update heading to match” has not been working in these docs)
- Make Header 2 font 14, bold; update heading 2 to match
- Select all (cmd-A), then:
- “add space” then “remove space after paragraph” throughout to make spacing a little more cozy (yes seems odd to do and undo, but it works)
- “add space” then “remove space before paragraph” throughout to make spacing a little more cozy
- Review doc and fix any further font weirdness
- Add page numbers
How to “update heading 1 to match”: (Stef notes this has not been working in these docs) In Google Doc, to update a text style (headings, normal text, with font type, size etc), highlight a section with the style you want, click the styles dropdown shown in the screenshot, and select e.g. “Update Heading 1 to match”. Double check the doc because we’ve noticed it missed some in an agenda.
3. GitHub Clinic - Generate Markdown Files for Each Participant
If you haven’t already, clone the Cohort Repo to RStudio (File > New Project > Version Control > Git) , then run the following code. Detailed instructions of what this looks like:
- Open the cohort repo as a project in RStudio and create a new script (temporary, you’ll deleted it but it’s a nicer place to work)
- Copy the following into the script, then delete the examples “Erin, Julie”. You’ll keep the
_demo.md, which is what you’ll demo live. - Go to the ParticipantsList, and copy the 2 first and last columns.
- Back in RStudio, put your cursor inside the “tribble” parentheses, then, in the Addin menu in the top of RStudio, select “Paste as Tribble”!
- If you have more than one participant list (e.g., from moore than one cohort), copy them individually into separate tibbles, then use
dplyr::bind_rows()to combine them into one tibble. - Then, double-check the column headers - they are likely not
firstandlastas is written in thekyber::short_namescall. The easiest thing is to update the column names in thekyber::short_namescode before running (for example:kyber::short_names(cohort$First.Name, cohort$Last.Name)
library(stringr)
library(datapasta) # install.packages("datapasta")
library(kyber) ## remotes::install_github("openscapes/kyber")
library(here)
library(fs)
library(dplyr)

## use `datapasta` addin to vector_tribble these names formatted from the cohort 1 spreadsheet!
cohort1 <- tibble::tribble(
  ~first,    ~last,
  "_demo",   "",
  "Erin",    "Robinson",
  "Julie",   "Lowndes"
)

## use `datapasta` addin to vector_tribble these names formatted from the cohort 2 spreadsheet!
cohort2 <- tibble::tribble(
  ~first,      ~last,
  "Andy",      "Teucher",
  "Julie",  "Andrews"
)

# Combine them into one tibble if you have multiple cohorts
all_cohorts <- dplyr::bind_rows(cohort1, cohort2)

# Create .md files for each Champion. `short_names()` makes sure duplicated first names
# are disambiguated with last initial.
kyber::short_names(all_cohorts$first, all_cohorts$last) |>
   create_github_clinic(here())

## copy trailhead image into parent folder
trailhead_png <- system.file("kyber-templates",
                               "horst-champions-trailhead.png", package = "kyber")
fs::file_copy(trailhead_png, here())
You’ll now have .md files for each participant in the cohort! Any duplicate names with have a _LastInitial. Check by clicking into the github-clinic folder and opening a file.
Now, commit and push the Markdown files in the github-clinic folder plus the `horst-champions-trailhead.png in the top-level folder to GitHub.com. Don’t push the .gitignore or .rproj since they’re not relevant for the Clinic. (You can do Command-A to select all files and then unclick those 2 you don’t want).
4. GitHub Clinic - Create GitHub team, add usernames
- Open RStudio, and create a new script (temporary, you’ll deleted it but it’s a nicer place to work)
- Paste the following in it and review the code. You may already have a GitHub PAT set; there is more information at the top of the README about it.
- Run this code first as-is with the example usernames in the
membersvariable to check - - Check that the example usernames were added in the Cohort GitHub: go to github.com/openscapes/cohort-name > Settings > Collaborators and Teams
- If the team was created with the username and appears in the repo, woohoo!
- Open the ParticipantList and copy the GitHub username column, including the header.
- In RStudio, put your cursor after
members <-and use thedatapastaAddin > Paste As Tribble to paste the usernames into themembersvariable, deleting the previous example user. - After pasting in the R script, rename the header as “username” (no spaces or asterices)
- Run the following code again and check that everyone was added!
- Finally, in the ParticipantList, highlight all usernames we’ve added in green. This helps us know who else to add during the live clinic session.
## First make sure you have a GitHub PAT set. If you need one, here's what you'd do:
# usethis::create_github_token() ## use their defaults plus `admin:org`
# Sys.setenv(GITHUB_PAT = "ghp_0id4zkO4GqSuEsC6Zs22wf34Y0u3270")

library(kyber)
library(rmarkdown)
library(tibble)
library(fs)
library(datapasta)

## create naming for GitHub - do this once!
repo_name <- "2022-nasa-champions"
team_name <- paste0(repo_name, "-cohort")
create_team(team_name, maintainers = "jules32", org = "openscapes")

## create member variable - do this twice (first as test!)
## this is where you'll use datapasta and run everything below
members <- tibble::tribble(
     ~username,
     "eeholmes"
  )

add_team_members(team_name, members = members$username, org = "openscapes")
add_team_to_repo(repo_name, team_name, org = "openscapes")
Yay! Now highlight those usernames in green in the ParticipantList for our bookkeeping!
Example Workflow - NASA Openscapes 2i2c JupyterHub Access
GitHub organization: https://github.com/nasa-openscapes-workshops
Teams: https://github.com/orgs/nasa-openscapes-workshops/teams
Add NASA Openscapes Mentor to AdminTeam
NASA Openscapes Mentors are given GitHub permissions to administer access for participants in workshops. To do this they must have an Owner role in the AdminTeam. To grant access to Mentor, an existing Owner of the GitHub Organization must add the Mentor’s GitHub username to the AdminTeam, then click on their name, which will take you to their page within the organization. Change their role to Owner, which is in a pulldown menu on left side of screen.
Add users to NASA Openscapes 2i2c JupyterHub for a workshop
Copy and run this code to give users access to the NASA Openscapes 2i2c JupyterHub by adding them to the relevant GitHub Team
library(kyber)
library(rmarkdown)
library(tibble)
library(fs)
library(datapasta)

team_name <- "WorkshopAccess-2i2c"

## for a long list of usernames, we can copy the list from a spreadsheet and use the datapasta Addin 'paste as tribble' and run everything below
members <- tibble::tribble(
  ~username,
  "virdi",
  "alexishunzinger"
)

add_team_members(team_name, members = members$username, org = "nasa-openscapes-workshops")
R package developer notes
Steps to edit kyber locally and review those edits:
- In RStudio, open
kyberproject, pull main branch - If you’ve been working in RStudio, restart your R session.
- Make edits to files (for example
inst/agendas/team_culture.Rmd) - In R console:
devtools::load_all()to load local edits forkyber - In R console, test whatever you edited. For example, to create the call agenda:
kyber::call_agenda(
    registry_url = "https://docs.google.com/spreadsheets/d/1Ys9KiTXXmZ_laBoCV2QWEm7AcnGSVQaXvm2xpi4XTSc/edit#gid=942365997",
    cohort_id = "2022-noaa-afsc-fall",
call_number = 4)- To review the call agenda, open
agenda.md, click Preview, and view it in the Viewer Tab.
Usually you can repeat steps 3-5 whenever you make edits you want to review, however if there are problems try restarting you R session.
To update the template for all Cohort README.Rmd’s, edit inst/rmarkdown/templates/openscapes-cohort-readme/skeleton/skeleton.Rmd
Contributing to Kyber
To contribute to Kyber, fork the repo, unchecking the “Copy the main branch only” box. Start working from the dev branch, create a new branch like new-branch dev, and then submit Pull Requests to dev. If using Git on the command line the workflow would look like:
- clone your fork of kyber
git checkout -b devgit pull origin dev- to start working on a new branch off of dev:
git checkout -b new-branch dev - add and commit changes
- then
git push origin new-branch - keep adding, committing, and pushing, then when you’re ready open a PR
We started using this workflow when the California Water Boards Openscapes team began using Kyber to create Agendas from some unique source Rmd files. For example, Water Boards Cohort Calls are 2 hours, not the default 1.5 hrs, their lesson order is different from Openscapes Core Lessons, and includes a new lesson on Documentation.
PR review process
We have established a lightweight workflow for PRs and PR reviews so that we have a process with which we are all familiar, and can help us be the most efficient.
It is based on the tidyverse code review principles.
For those of us who have write access to the repo and are close-knit collaborators we use the pattern described here.
The PR author submits a relatively small, focused PR and tags at least one person to review it. The reviewer reviews and provides comments, with inline suggestions where appropriate. It is helpful to “label” comments with their severity/importance.
If the PR is largely ok with some minor changes, the reviewer submits their review clicking Approve with comments. This signals to the author that there are changes that should be made, but it is up to the PR author to make the changes and decide that they meet the intent of the reviewer’s comments. The author then merges the PR themselves without further review. This means that PRs turn around faster and require less time of both the author and reviewer.
If there are more substantial changes to be made, then the Request Changes review button should be used, signalling that the reviewer would like to review the next round of changes before approving. When the author has finished their edits they re-request a review from the original reviewer.